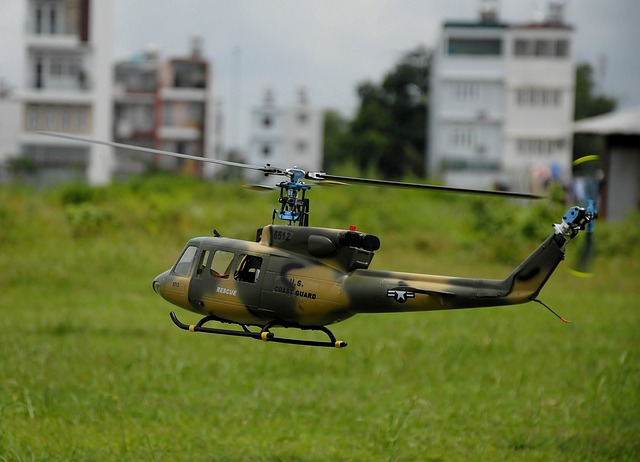
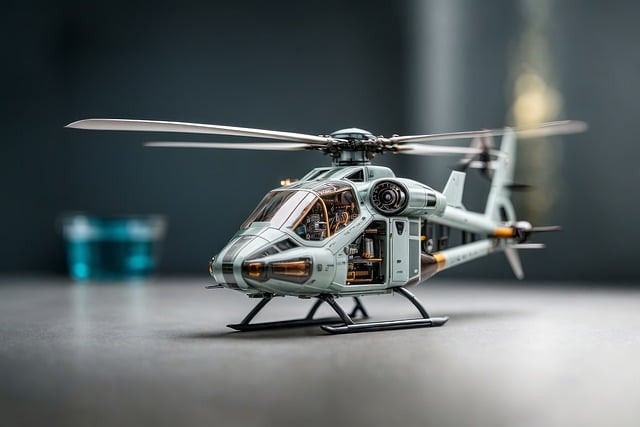
Home > R/C Helicopter Tools > Setup Tools


New Version - Less is more

  • The most accurate swashplate level on the market, period.
  • The most accurate pitch gauge on the market, period.
  • Unlike electronic angle meters, there is no electronic conversion, thus, no accuracy issues.
  • Fewer parts
  • Lower price
  • Easier to use

Tools that use the top or bottom of the swashplate depend on those surfaces to be perfectly machined. The fact of the matter is...they aren't perfect. What counts is the angle of the blade grips. When the swashplate is level, the angle of the blade grip doesn't change at all. Only when the swashplate is perfectly level can you be confident that your pitch settings are perfect.


LASER PITCH GAUGE / SWASHPLATE LEVEL - VERSION 2

LASER PITCH GAUGE / SWASHPLATE LEVEL - VERSION 2
In your basket: 
None
Price:
  $28.00
Code: LPGV2

141 IN STOCK


Quantity: 


Simplified Instructions

Attention: Flybar models must have the flybar locked so it is exactly perpendicular to the mainshaft. Use the ELRC500. (see the FAQ at the bottom of the page)


Level the Swashplate

  1. Attach the tool to one of the blade grips. If the screw provided isn't long enough, use any 3mm bolt.
  2. Disconnect the link to the grip.
  3. Fix the grip so it doesn't rotate and is close to zero pitch. Use some tape.
  4. Mark points on the wall (or any stationary object) that coincide with the outer balls on your swashplate (3 or 4 points).
  5. Take the tape off the grip and reconnect the link.
  6. Fiddle with the sub-trim / control rods until the laser passes over all points as you rotate the head.
  7. DONE.

Set the Pitch - Be sure to level the swashplate first

  1. Set the model on a table so the main shaft is 80 inches from the wall and the nose is pointing right at that wall.
  2. Find zero pitch. I like to cut a flybar in half and stick the halves through the blade bolt holes, (watch the videos) then move the collective and adjust the pitch rods until the flybar halves line up with each other AND the main shaft.
  3. Turn on the laser and mark zero pitch.
  4. Measure up from zero 17 inches and mark that point. Measure down 17 inches and mark that point. At 80 inches from the wall those three points denote 12 degrees positive, Zero and 12 degrees negative.
  5. Set your pitch curve to your liking. If 80 inches doesn't work for you or you want to mark other pitch points, use this chart.


Video Instructions Part1

Video Instructions Part2

Thank you for purchasing this tool. I'm sure you will get a lot of use out of it and enjoy the ultra precise setups you can achieve. Ron Lund

Features

  • Designed for Flybarless Models, but works equally well on models with flybars when used with a flybar lock that allows the head to rotate such as the ELRC500.
  • Laser accuracy beyond anything you've seen before.
  • The best pitch gauge you can buy.
  • The best swashplate leveling tool you can buy. No need for others.
  • Works on helicopters with grips that have 5mm root thickness and larger.

You will also need a roll of Blue painter's tape available anywhere paint is sold.


Step by Step Detailed Instructions


Getting Ready
  1. If you have a flybar, lock it in the level position using a tool that will allow the head to rotate.
  2. At one end of the Laser Pointer you will see a small plastic tab. Pull it out. Doing so allows the battery to make contact.
  3. Insert the Laser Pointer into the holder so that the laser on off switch is lined up with the clamping screw. Run the clamping screw in just enough to turn on the laser, then back it out until the laser goes off.
  4. Set your model on a solid surface close to the center of the room with the nose pointing toward the farthest wall. Check to make sure the table doesn't block the laser when the model is at low pitch. If it's an extremely light model, you might want to tape it to the surface using blue painter's tape. Once it is set in position, it shouldn't be allowed to move until you are finished leveling the swashplate and checking for interaction. If you are working on a smooth flat surface, it won't hurt if it moves a little bit, but it's best if it doesn't.
Setting the Reference Points
  1. Remove both main blades and pop the link off one of the blade grips. The radio can be turned off.
  2. Clean any oil residue from the blade grip and head block. Using Blue painter's tape, tape the unlinked grip so it doesn't rotate. Get close to zero pitch. Eyeball zero is good enough for now. The model does not need to be perfectly level. Insert the device into the blade grip so that you are shooting a beam straight to the front of the model.
  3. Line up a small piece of Blue painter's tape so the center of the dot is in the center of the tape.
  4. Rotate the head completely around to make sure the laser still points directly at the reference point. I like to turn the head using the tail blades but it's okay to touch the head..just be gentle.
  5. Rotate the head 90 degrees and mark the point. Repeat this three times until you have marks in 4 places 90 degrees apart.
Leveling the Swashplate
  1. Remove the tape from the blade grip and carefully reattach the link. Be careful not to disturb the model. Again, taping the model down helps.
  2. Turn on your radio.
  3. Rotate the head and adjust the pitch until the dot is on Reference Point #1.
  4. Rotate the head 180 degrees so the dot is lined up with the opposite reference point. Using elevator trim (good), subtrim (better) move the dot so it is half the distance back to the reference point. Move the pitch stick until it is on the reference point. Rotate the head back to Reference Point #1 and it should be lined up. If not, move the pitch stick until it is and then repeat this step. Don't be disappointed if you can't get it to line up exactly. As you noticed, one click of trim makes a big difference and the resolution of this device far exceeds your radio. If it seems like your links are sticking, see the FAQs.
  5. Repeat this for the aileron axis. When you are finished, you should be able to rotate the head and watch the dot pass over all of the reference points. That means that your swashplate is giving zero input to the blade grip. It's perfectly level !!
Now Let's Find Zero Pitch
  1. When leveling the swashplate, we aren't concerned with zero pitch as long as it's "eyeball" close. But if we are going to achieve a perfect setup, we want it to be exactly zero. To do this use any method you are comfortable with. I like to get a flybar that will fit in the blade grip bolt holes, cut it in half and put the two halves through the blade grip bolt holes. Then move the collective until they line up and are parallel with the main shaft. That's zero pitch. If the flybar halves are parallel, but not parallel with the main shaft, the blades aren't going to track. Adjust your pitch rods so the flybar halves are both in line with the main shaft.
Setting your Pitch
  1. Measure the distance from the mainshaft to any wall (the one the Zero Pitch mark is on) in inches.
  2. Using the chart below, mark the pitch settings that concern you (usually hover and max), by measuring up and down from our Zero Pitch Mark and sticking a piece of Blue painter's tape at those points. Example: Let's say I want to set my pitch so that I have 10 degrees at full up and down and 4 degrees at 1/4 and 3/4 stick. My head button is 80 inches from the wall. At 80 inches, according to the table, 10 degrees is 14.11 inches and 4 degrees is 5.59 inches. I will place a piece of tape 14.11 (14 1/8) inches above the Zero Pitch Mark and another equidistant below it. I will put another piece of tape 5.59 (5 1/2) inches above and one more equidistant below. Now adjust your pitch curve so full up puts the dot on the highest point, full down puts the dot on the lowest point and the quarter stick positions line up with the hover points.
  3. If you want to know how much pitch you have, simply raise your pitch to its maximum and measure from the dot to the Zero Pitch Mark. Look up the measurement in the chart and read your pitch from the Degrees column.
Making sure the Blades Track
  1. Up until now, we have only concerned ourselves with one blade grip. We'll call this the "Primary Grip".
  2. If your model has a flybar, make sure the rods that control the pitch of the Secondary Grip match the length of the rods going to the Primary Grip exactly.
  3. With the Laser Pitch Gauge still in the Primary Grip, adjust your pitch so the dot is on the Zero Pitch mark. Rotate the head 180 degrees.
  4. Carefully move the Laser Pitch Gauge to the Secondary grip and make adjustments to the rods so the dot is on the Zero Pitch Mark. Move the device back to the Primary Grip and make sure nothing moved. Your blades should track perfectly.
Checking for Swash Plate Interaction We are basically leveling the swashplate at the high and low pitch positions.
  1. Without disturbing the model, remove the link to the Primary Grip. Using Blue painters tape, fix the pitch of the grip so the device puts a dot on the highest pitch point that you have marked. Rotate the head 90 degrees and mark that point. Repeat until you have "High Marks" at all four positions.
  2. Do this again for the lowest pitch and place "Low Marks" at all four quadrants. Now reattach the link using caution not to disturb the model. Turn on your radio and raise the pitch to high stick. The laser should track over all four "High Marks" and when you lower the pitch to its lowest point, it should track over all four "Low Marks".
  3. Make necessary adjustments using Program Mix in your radio to ensure this happens.

Alternate method:

Make up two new "setup" control rods so one is longer than the actual rod and one is shorter. The length of these "setup rods" will put the laser on the original 4 reference points that you marked in the "Leveling the Swashplate" step when the swashplate is at it's highest point and at it's lowest point. Use these rods to check for interaction.

Pitch Table ... Printable PDF with expanded data
  Distance In Inches                    
Degrees 60 65 70 75 80 85 90 95 100 105 110 115 120
1 1.05 1.13 1.22 1.31 1.40 1.48 1.57 1.66 1.75 1.83 1.92 2.01 2.09
2 2.10 2.27 2.44 2.62 2.79 2.97 3.14 3.32 3.49 3.67 3.84 4.02 4.19
3 3.14 3.41 3.67 3.93 4.19 4.45 4.72 4.98 5.24 5.50 5.76 6.03 6.29
4 4.20 4.55 4.89 5.24 5.59 5.94 6.29 6.64 6.99 7.34 7.69 8.04 8.39
5 5.25 5.69 6.12 6.56 7.00 7.44 7.87 8.31 8.75 9.19 9.62 10.06 10.50
6 6.31 6.83 7.36 7.88 8.41 8.93 9.46 9.98 10.51 11.04 11.56 12.09 12.61
7 7.37 7.98 8.59 9.21 9.82 10.44 11.05 11.66 12.28 12.89 13.51 14.12 14.73
8 8.43 9.14 9.84 10.54 11.24 11.95 12.65 13.35 14.05 14.76 15.46 16.16 16.86
9 9.50 10.29 11.09 11.88 12.67 13.46 14.25 15.05 15.84 16.63 17.42 18.21 19.01
10 10.58 11.46 12.34 13.22 14.11 14.99 15.87 16.75 17.63 18.51 19.40 20.28 21.16
11 11.66 12.63 13.61 14.58 15.55 16.52 17.49 18.47 19.44 20.41 21.38 22.35 23.33
12 12.75 13.82 14.88 15.94 17.00 18.07 19.13 20.19 21.26 22.32 23.38 24.44 25.51
13 13.85 15.01 16.16 17.32 18.47 19.62 20.78 21.93 23.09 24.24 25.40 26.55 27.70
14 14.96 16.21 17.45 18.70 19.95 21.19 22.44 23.69 24.93 26.18 27.43 28.67 29.92
15 16.08 17.42 18.76 20.10 21.44 22.78 24.12 25.46 26.79 28.13 29.47 30.81 32.15


FAQ

How much accuracy can I expect?

That depends on several things. If you are using good servos and a 2048 system on a quality model with properly fitting linkages, you can easily achieve accuracy within one click of trim. The pitch gauge accuracy depends on how far the farthest wall is from the model. Even in a small 12 x 12 room, one degree of pitch is represented by over 1.25 inches on the wall, whereas a typical mechanical pitch gauge has increments of about 0.06 inches. One tenth of a degree is a no brainer.

So a bigger room is always better?

Usually, yes. However you could do this in a walk-in closet and still get more accuracy than a standard pitch gauge and do a lot less walking. Any room over 20 feet long is overkill...but feel free to overkill all you like.

What if my room isn't square?

It doesn't matter at all. In a rectangular room, I like to position the model so it is the same distance from 3 walls and use the farthest wall for my pitch readings. The room can be odd shaped also. Once the laser travels over all the marks, the swashplate is level, period.

I would like to calculate my own scale. What's the formula?

Ok. Let's say you want to figure out how far to place a mark above the zero pitch mark in order to read 12 degrees at 103 inches. Find the Tangent of 12 degrees (0.2126) and multiply it by 103 = 21.89 inches. You can find the Tangent in the downloadable PDF file above the chart. It is in the second column from the left side and is labeled Factor.

My wife says I can't stick tape on the walls. What can I do?

Take her out to dinner at a nice restaurant and explain to her that Blue painters tape doesn't leave any residue and it won't peel the paint off. If that hover reference point happens to end up on one of her collectible porcelain figurines, tell her it'll only be there for a little while. Leave a good tip for the waitress. They like that. On the way home, stop by Walmart and pick up a roll or two. Get the wide stuff and cut strips for reference points.

Taping the grip so it doesn't rotate doesn't seem too elegant. Couldn't you have done better?

I suppose I could have, but each model would require it's own device and that would get expensive. I did play around with a couple mechanical ways, but in all honesty, I like the tape a lot better. Once you try it, you'll see what I mean. Remember, any device you use needs to allow for small corrections to the grip rotation. The tape does this really well. Just be sure to degrease the grip and headblock first.

No matter what I do, when I'm leveling the swashplate, I can't get it to hit the points on both sides.

Once you have it as close as possible, you have reached the maximum accuracy attainable by your model/radio/servo combination. If it's a fraction of an inch high on one side and a fraction of an inch low on the other side, rest assured, your swashplate is as level as it can be. Sometimes tinkering with half turns on the control rods might bring it a little closer.

Sometimes the dot doesn't move with each click of the trim. It seems like my links are sticking.

The Laser Pitch Gauge is the only tool accurate enough to let you see that your links are sticking. If they are sized properly and still stick, try some Permatex Dielectric Tune Up Grease, available at almost any auto part store. Just put a tiny dab on each side of the ball and rotate the link back and forth. Wipe off any excess. If the links aren't sized properly, either accept the fact that your links are going to stick and your model is going to fly like crap, or size them.

How long do the batteries last?

I don't know. I've setup several models and worn my cat out a few times and they're still going strong. If they do wear out, drop by any large drug store and pick up a pack of LR44 batteries. It takes 3. They go in so the flat sides are all facing out. When you're done using the tool, insert the little plastic tab that was in there when you got the tool. That will ensure that the laser doesn't get turned on accidently.
If the laser has sat around for a while, try taking the batteries out and clean them off with a clean cotton rag.

After doing the setup, I still had to trim my model.

That's normal. The tool allows you to achieve a perfect static setup but does not allow for variations in the center of gravity, wind or the physics of rotating bodies. Transfer any trim settings to subtrim so you can have your trim tabs centered. It's normal for the swash to tilt about 2 degrees right in a hover and 1 degree left in fast forward flight.

I'm working on a T-rex 450 and it's hard to keep it from moving.

Get a piece of wood as long as your table is wide. Drill two holes in the edge that match the rear of the landing skids. Clamp or tape that board to your work table. Sink a couple screws in the top and use a heavy rubber band to keep the model from sliding forward. This works well on larger models too, and it keeps the landing gear from sagging. Remember, the model doesn't have to be level, just still.

Can I check for interaction?

Absolutely. Make two extra control rods. One is longer than the rod now going to your grip. One is shorter. The lengths are determined by the distance your swashplate moves from zero pitch to max pitch and zero pitch to minimum pitch. Simply move your swashplate to it's extreme positions, both high and low, and make rods that will put the grip that has the laser pitch gauge installed in it at zero pitch. You can then use your original reference points. If you can't get the laser exactly over the mark, a small adjustment on the collective stick is okay. This is, by far, the most accurate way to check for interaction. No other tool on the market offers accuracy like this!

I have a flybar. Does everything work the same way?

Yes and No. When you're leveling the swashplate, if you can, it's best to have a rod going directly from the swashplate to one of the grips, bypassing any mixing arms. When you're setting the pitch, be sure to have all of the rods hooked up to your mixing arms.
How do I know if my flybar is level?

Rotate the head so the trailing edge of one of the paddles is directly over the tail boom. Measure the distance from the trailing edge to the top of the boom. Now, rotate the head 180 degrees. Measure again to the same spot on the boom. The measurements should be the same. If you're trying to work with a flybar that is bent even slightly, DON'T.


Copyright © 2010 Ron Lund, RONLUND.COM and Ron's Heliproz South All rights reserved

Related Item(s)


STANLEY 3.5M METRIC TAPE MEASURE STANLEY 3.5M METRIC TAPE MEASURE
Code: STANLEY33_215
Price: $15.95
5 IN STOCK
Quantity in Basket: none